Creating & Managing Invoices
Accessing Invoicing
In the sidebar, click Accounting → Invoicing to see the invoice list, or open an invoice directly from the Accounting Dashboard or Payments screen.
The Invoice List
The list shows every invoice for your account with its client, invoice number, date, due date, payment terms, total, and status.
- Filter by status using the pill buttons at the top: All, Unpaid, Paid, or Cancelled.
- Click anywhere on a row (or View) to open that invoice.
- If you have the Owner role, an additional cancel button (✕) appears on Unpaid invoices — see Overview for what cancelling does.
Creating a New Invoice
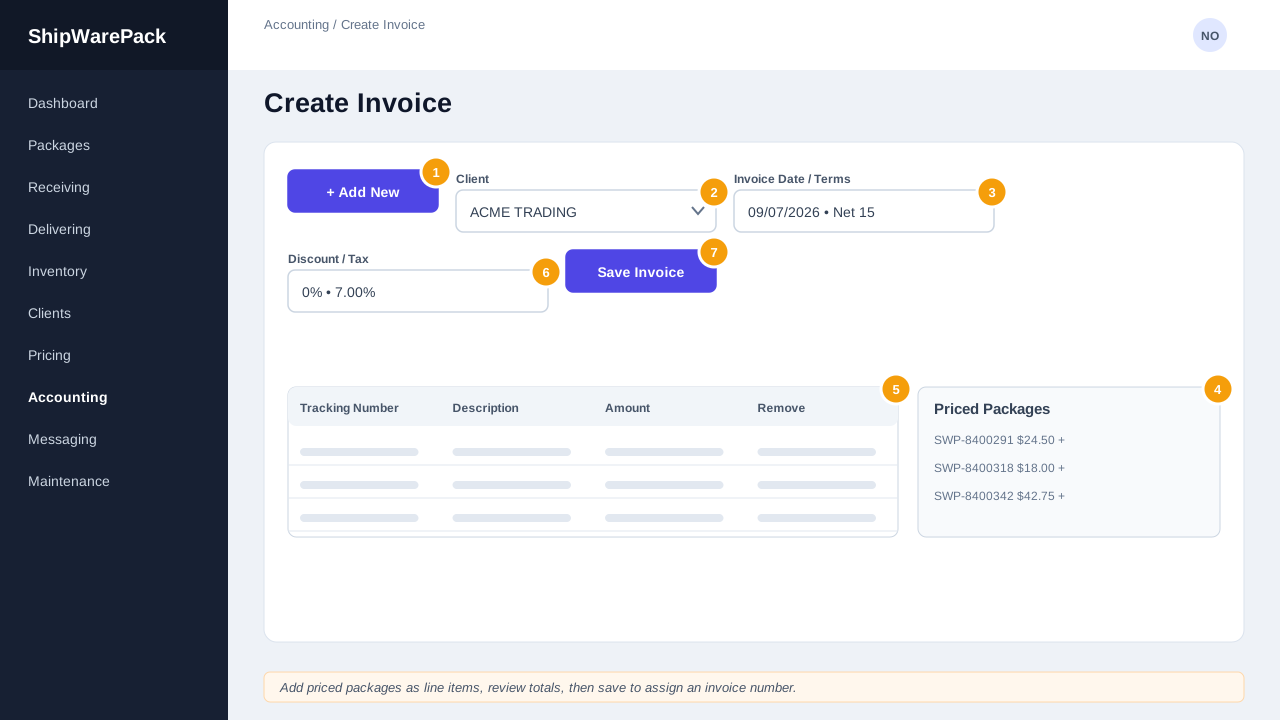
- Click + Add New.
- In the Choose a Client popup, search for and select the client you're invoicing.
- You're taken to a blank invoice for that client, with an Invoice Date, Payment Terms, and Currency already defaulted — change any of these before saving if needed. These three fields can only be set now; they lock once the invoice is saved.
- On the right, the Priced Packages panel lists that client's priced, not-yet-invoiced packages. Use the date filter and search box to find specific ones.
- Add packages to the invoice either by:
- Clicking the + button on a package, or
- Dragging the package card into the line-item table.
- Optionally set a Discount (percent or fixed amount) and adjust the Tax Rate (pre-filled from your customer profile's default).
- Click Save. The invoice is assigned its number at this point and the page becomes the invoice's permanent edit view.
Line items aren't manually typed
Every line item comes directly from a priced package — its description, tracking number, and amount are read from the package's current price. To change a line's price, click the $ icon next to it, which opens Pricing Explorer scoped to that package. The change is reflected back on the invoice automatically.
Removing a Line Item
Click the ✕ next to a line item to remove it from the invoice (this doesn't affect the underlying package's price — the package simply becomes available to add to an invoice again).
Discard vs. Cancel
- On a new, unsaved invoice, the top-left button reads Discard and simply abandons the draft.
- On a saved invoice, the same button reads Cancel Invoice and requires the Owner role — see Overview.
Preview & Print
Click Preview to see the invoice formatted as a printable document, with a Print button. Preview works both for unsaved drafts and saved invoices.
Sending an Invoice
Click Send to message the invoice to the client through the built-in Messaging system. Since clients don't have their own invoice portal, the full invoice — every line item, the total, and the due date — is included as text in the message body.
Applying a Payment
On any saved, Unpaid invoice, click Apply Payment to open the payment form. See Payments for details.
The Paid Watermark
Once an invoice is marked Paid, a translucent diagonal PAID watermark appears across the invoice (both on screen and when printed), and its line items and totals can no longer be changed — either directly or by a later price edit elsewhere in the app.